Here will show a brief example and overview of the process when adding a CSV for Bulk Upload.
This includes the bulk upload for categories and products
Here's a snapshot of the most commonly used attributes when bulk uploading; however, these are not the only options of attributes, there's a list of options that will be shown further down.
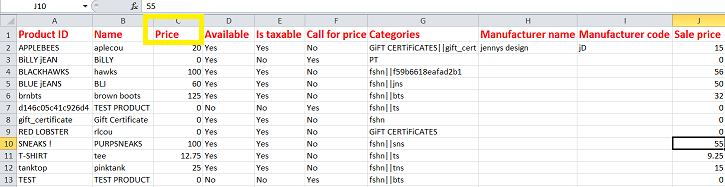
-Product ID: this here is pretty self explanatory this would be your [unique] product ID.
-Product Name: this also is pretty easy this would just be the name for your product.
-Price: this would be the price for your product [i NEED TO STRESS] notice that the currency is NOT displaying, putting the $ sign will not work!
-Available: this would simply be the option to show if this product is available.
-Taxable: this here will display if it's a taxed product.
-Call for Price: this is a a neat feature depending if you have products that are only being displayed, and not for sale you could specify call for price so that way no price will display on your product.
-Categories: this would be the name of the category where your product would go. If you do have subcategories then you would need to separate them with the symbol "||"
---->example testing||test
-Manufacturer name: this would simply be [if you have set any] a manufacturer name
-Manufacturer code: [if you had set a manufacturer earlier] this where you would put the manufacturer code
-Sale Price: This would be the place you would want to specify if the product is on sale [AGAiN, currency is NOT required just the number amount]

The last couple things that are most popular and I'd like to go into depth with are the following;
-Description: this is the description of the product as far as what the product offers
-Overview: this is what will display on the site of what that specific product has and will offer
-Attribute Options: ultimately you can put a () with specifications on each type of that product so like you see here
---> example:
-You don't always use this for sizes, this also goes for colors like the picture on the CSV files displays.
-NOTE all options must be separated with "||" in between each specification
----> example:
testing attribute(-25) ||test(+25)
-Attribute Name: this is what the name of the attribute will look like in the admin area; not on the live site
-Attribute Caption: this is the name of the option THAT iS displayed on the site [size and/or color, etc]
--->example one:

-This example here shows how with attribute [type] shows "select" when you choose the option of a a drop down box. That's something that also NEEDS TO BE STRESSED. if you
type in drop down box it WiLL NOT WORK.
-The priority is simply where you would like to have it listed on the site; it ranges from 1-10
--->example two:

In this example I used the attribute of Radio Buttons, notice how that code says "radio". I also set this priority as 2 for the second one down that would be displayed.
--->example three:

This example is shown with the attribute option of Text Input. If there is any sort of customization on the product this is where the customer would put in that input.
The attribute option that lists the number 50 lets you know that's the maximum characters allowed per product.
--->example four:

This last example shows the text area option, this one is just like the one above. The difference added is the attribute options, which I set to 100 for maximum of characters.
--->example five:
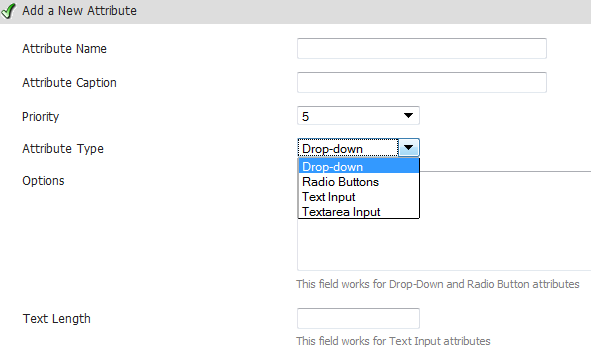
The image above shows the screen you would see when adding attributes towards your site. Like shown the text length is only required for the attribute options of
"text input" or "text area input." The Options area is only necessary when using radio buttons or the drop down box.
--->example six:
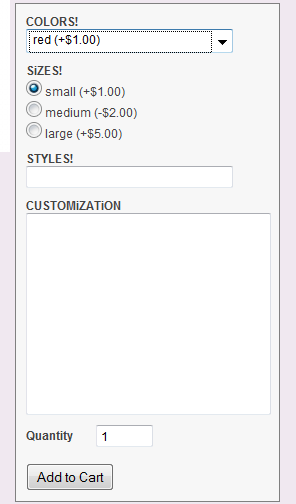
-This is the last example displaying what the site would look like live with a drop down box, radio buttons, text input and text area input.
There's a wide number of what exactly is exported and specified on the CSV file;
-Product SKU
-UPC code
-Location name
-Location code
-Lock Product <--- this is to keep your product locked in with price, name, code, etc
-Lock fields <--- this also applies to the above [lock product]
-Meta Keywords <---- all the meta specific fields will be specified towards SEO options
-Meta Title
-Meta Description
-Priority <--- this is a neat tool to have changing the priority and/or appearance of how products are listed
-Rating
-Reviews Count
-Date Added
-Tax class name
-Tax Class ID
-Tax rate on Product Level
-Price Level [1-3] <--- you can change the price levels as another attribute with the products
-Shipping Price [Product Level] <--- shipping can also have product levels depending on where it's heading
-Free Shipping
-Weight
-Inter Pack
-Case Pack
-Minimum Order
-Maximum Order
-On Home Page <--- This is for your products that are new and you can't wait to advertise, they'll be on the home page!
-Hot Deal <--- special promos/sales is a "HOT DEAL" you can mark your products with advertisement
-Dollar Days Product
-DOBA Product
-Default Product URL
-Custom Product URL
-Digital Product <--- you would specify if this is or is NOT a digital product
-Digital Product file <--- this is where you specify the location of digital product
-Track Inventory <--- vital to have when you would like to track your inventory!
-Stock
-Stock Warning
-Inventory Rule
-Image URL
-Image Location
-Image Zooming Option
-Image Alternative Text
There is such a variety of what is available throughout your cart and when uploading and/or doing a data backup through CSV. It isn't required to have all these fields included in your template for an upload. For categories it's important to have both the name and ID; for products, the name and ID are also required. Otherwise these are some steps and helpful hints of going about uploading a CSV bulk upload; good luck!
This includes the bulk upload for categories and products
Here's a snapshot of the most commonly used attributes when bulk uploading; however, these are not the only options of attributes, there's a list of options that will be shown further down.
-Product ID: this here is pretty self explanatory this would be your [unique] product ID.
-Product Name: this also is pretty easy this would just be the name for your product.
-Price: this would be the price for your product [i NEED TO STRESS] notice that the currency is NOT displaying, putting the $ sign will not work!
-Available: this would simply be the option to show if this product is available.
-Taxable: this here will display if it's a taxed product.
-Call for Price: this is a a neat feature depending if you have products that are only being displayed, and not for sale you could specify call for price so that way no price will display on your product.
-Categories: this would be the name of the category where your product would go. If you do have subcategories then you would need to separate them with the symbol "||"
---->example testing||test
-Manufacturer name: this would simply be [if you have set any] a manufacturer name
-Manufacturer code: [if you had set a manufacturer earlier] this where you would put the manufacturer code
-Sale Price: This would be the place you would want to specify if the product is on sale [AGAiN, currency is NOT required just the number amount]
The last couple things that are most popular and I'd like to go into depth with are the following;
-Description: this is the description of the product as far as what the product offers
-Overview: this is what will display on the site of what that specific product has and will offer
-Attribute Options: ultimately you can put a () with specifications on each type of that product so like you see here
---> example:
| Small(-25,-0.25) | Decrease price by 25, decrease weight by 0.25 |
| Medium(-10%,+1) | Decrease price by 10%, increase weight by 1 |
| Large(0,+2) | Price will remain the same, increase weight 2 |
| X-Large(+10.00) | Increase price by 10 |
-NOTE all options must be separated with "||" in between each specification
----> example:
testing attribute(-25) ||test(+25)
-Attribute Name: this is what the name of the attribute will look like in the admin area; not on the live site
-Attribute Caption: this is the name of the option THAT iS displayed on the site [size and/or color, etc]
--->example one:
-This example here shows how with attribute [type] shows "select" when you choose the option of a a drop down box. That's something that also NEEDS TO BE STRESSED. if you
type in drop down box it WiLL NOT WORK.
-The priority is simply where you would like to have it listed on the site; it ranges from 1-10
--->example two:
In this example I used the attribute of Radio Buttons, notice how that code says "radio". I also set this priority as 2 for the second one down that would be displayed.
--->example three:
This example is shown with the attribute option of Text Input. If there is any sort of customization on the product this is where the customer would put in that input.
The attribute option that lists the number 50 lets you know that's the maximum characters allowed per product.
--->example four:
This last example shows the text area option, this one is just like the one above. The difference added is the attribute options, which I set to 100 for maximum of characters.
--->example five:
The image above shows the screen you would see when adding attributes towards your site. Like shown the text length is only required for the attribute options of
"text input" or "text area input." The Options area is only necessary when using radio buttons or the drop down box.
--->example six:
-This is the last example displaying what the site would look like live with a drop down box, radio buttons, text input and text area input.
There's a wide number of what exactly is exported and specified on the CSV file;
-Product SKU
-UPC code
-Location name
-Location code
-Lock Product <--- this is to keep your product locked in with price, name, code, etc
-Lock fields <--- this also applies to the above [lock product]
-Meta Keywords <---- all the meta specific fields will be specified towards SEO options
-Meta Title
-Meta Description
-Priority <--- this is a neat tool to have changing the priority and/or appearance of how products are listed
-Rating
-Reviews Count
-Date Added
-Tax class name
-Tax Class ID
-Tax rate on Product Level
-Price Level [1-3] <--- you can change the price levels as another attribute with the products
-Shipping Price [Product Level] <--- shipping can also have product levels depending on where it's heading
-Free Shipping
-Weight
-Inter Pack
-Case Pack
-Minimum Order
-Maximum Order
-On Home Page <--- This is for your products that are new and you can't wait to advertise, they'll be on the home page!
-Hot Deal <--- special promos/sales is a "HOT DEAL" you can mark your products with advertisement
-Dollar Days Product
-DOBA Product
-Default Product URL
-Custom Product URL
-Digital Product <--- you would specify if this is or is NOT a digital product
-Digital Product file <--- this is where you specify the location of digital product
-Track Inventory <--- vital to have when you would like to track your inventory!
-Stock
-Stock Warning
-Inventory Rule
-Image URL
-Image Location
-Image Zooming Option
-Image Alternative Text
There is such a variety of what is available throughout your cart and when uploading and/or doing a data backup through CSV. It isn't required to have all these fields included in your template for an upload. For categories it's important to have both the name and ID; for products, the name and ID are also required. Otherwise these are some steps and helpful hints of going about uploading a CSV bulk upload; good luck!
